Hi Quilting Friends,
Welcome back to the “Black & White Delight” Quilt-Along. If you’re just joining us, you may want to have a look at the “Welcome” post to help you catch up.
Today you’re making the Fireworks block! It will have you going “Oooh! Aaahhhh!”
Here’s what you’ll need today!
- Fabric pieces from your Block 2 baggie
- Sewing machine (obviously!)
- Iron & ironing board
- Thread
- Scissors for snipping thread
- Pencil
- Rotary cutter & mat
- Ruler(s) I like my little 1″ by 6″ ruler for marking squares
- And my 3.5″ by 12.5″ ruler for cutting
- Beverage & snack(s) for hydration and energy!
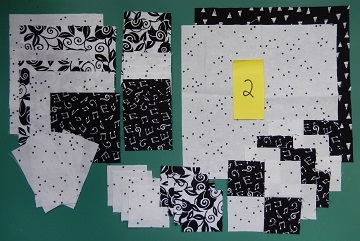
Here are the contents of my Block 2 baggie:
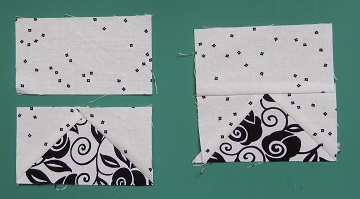
Our first step is to make the four sides of the central block. You’ll need the eight small Fabric E and Fabric F squares and the larger Fabric B square, as described in Steps 2 and 3 on page 9 of the pattern.
The smaller squares will be attached to the corners of the larger square with the “sew, trim, and flip” method.
- Draw a diagonal line on the wrong side of each of the smaller squares.
- Place one of the smaller squares on top of the larger square, right sides together.
- Sew along the pencil line, and then cut off the outer corner. Leave the 1/4″ seam allowance. Press the smaller square toward the outside edges.
- Repeat for all four sides of the larger square, placing fabrics as shown in the picture.

Now let’s make the corners of the central block! You’ll need a larger square of Fabric B and a square of Fabric E, as well as four smaller squares each of Fabric B and Fabric E. The sizes are provided in Step 5 on page 9 and Step 8 on page 10 of the pattern packet.
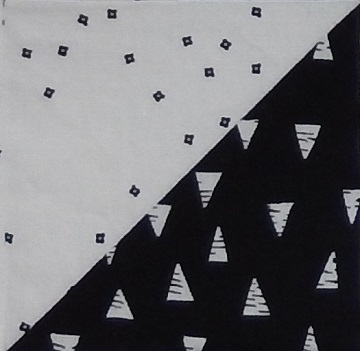
We’ll make eight HST squares, as described in last week’s “Friendship Star” post.


Trim the HST squares to size, and then lay them out as shown in the photo below. Sew the corners together like this:

Now we’re going to put the central block together! You’ll need the Fabric F square and the piece that we’ve just made. Sew them into three rows of three squares each, and then sew the rows together, like this. (Note that your pieces will not have the seams in the middle of the side pieces; I simplified the piecing to reduce bulk but didn’t make my block again!)

Let’s add the frame to your fireworks block! You’ll use the rest of the pieces from your baggie.
Begin by making a set of four flying goose units from the Fabric E square and the four Fabric B squares, trimming as described in Step 4 on page 8 of the pattern. Use the technique that we practiced in the “Geese on the Fly” post! This time you’ll make just four geese.
Use the rectangles of Fabric B to make the centers of the block edges, like this!
Make eight HST squares from the largest Fabric A and Fabric B squares.
And then sew them to the sides of the four block edge centers, like this:

Add a 4-patch square to both sides of two pieces:

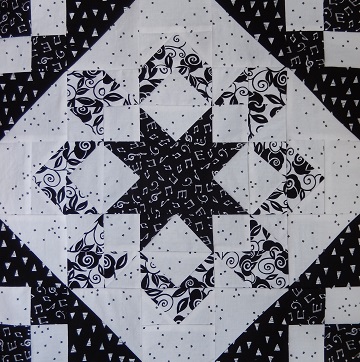
And then sew the frame to the central block, like this! “Oooh! Aaaaah! Fireworks are amazing!”
Purchase the Fireworks block pattern by clicking the button below.
Time to show off your beautiful Fireworks block! We’d ALL love to see a picture, so snap a photo and post it on Instagram please.
#bwqal_yourname @mspdesignsusa
Next week we’ll sew the Entwined Star block! Until then, may your stitches be straight, your bobbins full, and your seam ripper languishing in the sewing basket.
Happy quilting,
Sharon

One thought on “Fireworks”
Comments are closed.