Hi Quilting Friends,
Welcome back to the “Black & White Delight” Quilt-Along. If you’re just joining us, you may want to have a look at the “Welcome” post to help you catch up.
Before we start stitching, let’s make sure that your sewing machine is ready to do its best work. I’ve had my ‘Nina for 26 years, and she runs like a top because I treat her gently, talk to her nicely (well, most of the time), and keep her moving parts clean and well-lubricated. So here’s the list that I use when I’m getting ready to start a new project:
- Remove the bobbin case and bobbin, then use a small lint brush to brush away all stray threads & lint from the area.
- Add a tiny drop of oil to the moving parts around the bobbin case, to reduce friction.
- Remove the needle plate and brush out any thread and lint that has collected in that area.
- Change out your needle, if you haven’t done it in a while. Sewing machines enjoy a new needle every now & then, as it helps them make your stitches nice & even!
- Fill up a spare bobbin. It’s not fun to have to stop to fill one after you’re into the rhythm of sewing.
It’s a good idea to repeat the cleaning & lubrication process each time your bobbin runs out of thread. It only takes a couple of minutes, and your machine will thank you!
Next, let’s gather the supplies that you’ll need today:
- Strips of Fabric B and Fabric F for the little 4-patch squares
- These were set aside after we finished cutting the other pieces last week
- Squares of Fabric D for the larger squares in the double 4-patch blocks
- Find them in your Wild Goose Chase baggie!
- Thread for piecing (I usually choose a light gray, as it blends with all of the fabric)
- Scissors for snipping thread
- Rotary cutter & mat
- Ruler (I used my 3.5″ by 12.5″ ruler)
- Iron
- Ironing board
You may also want to have a beverage and a snack close at hand, to maintain your hydration and energy level. It is never a good idea to sew when you’re “hangry”. I frequently need to remind myself to drink the glass of water that sits beside the sewing machine as I stitch; make sure that you take a break every now & then! Get up, walk around the block, and have some fresh air. The sewing will be there when you return.
Time to sew! Grab one strip each of Fabric B and Fabric F. Place them right sides together, lining up the edges. Sew along one side, exactly 1/4 inch from the cut edge. When you get to the end of the first two strips, keep going with the next pair of strips! You don’t need to cut the threads, just chain-piece ’em, end to end. Continue with this until you’ve sewed all of the strips of Fabric B to a strip of Fabric F. I tend to be a bit of a speed demon on this part! Make sure that you take care to maintain the 1/4″ seam allowance as you zip through your strips.
Press the strips “toward the dark side”. I always feel a bit like a Darth Vader when I do this, except that I’m not evil or angry, unless I’ve forgotten my snack, and then all bets are off! I normally begin by pressing the piece flat, as it was when I was stitching, to lock the stitches in place. Then I press it open from the right side, to ensure that there aren’t any folds along the seamline. Don’t be too agressive with your iron; you don’t want to distort the fabric strips! Use the Force wisely.


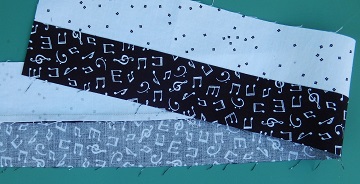
Now it’s cutting time! Place two of your sewn strips right sides together, “nesting” the seams. The photo below shows how the pieces are virtually locked together when the seams are snuggled up against each other. How cozy!

Now you can cut your strips into sections, using the length from Page 4, Step 2 in the pattern packet. You’ll be making 52 little 4-patch squares for the wild goose chase blocks, 32 for the pieced blocks, and 20 for the pieced borders , so go ahead and cut 216 strip pairs of Fabric B + Fabric F pieces. Whew! That’s a LOT of little strip pairs, isn’t it!
Next, sew the strip pairs together to make your little 4-patch squares. Keep the seam allowance at 1/4 inch, and make sure that those seams are “nested” so they match when the sewing is done. I usually chain-stitch when I’m making multiples of the same unit; just sew one piece after another without stopping to cut your thread.


Press the seams to one side after cutting the threads that connect the 4-patch units to each other. You’ll end up with a tower of little 4-patch units, like this:

Count out 20 of the little 4-patch units and place them in the baggie with the rest of the pieces that you’ll use for the pieced borders. Count 32 more of the little 4-patch units and add four of them into each of bags #1-8, which already have the cut fabric for your pieced blocks.
Not quite finished yet! You’re going to use the remaining 56 little 4-patch units to make 28 double 4-patch blocks. You’ll also need the 56 Fabric D squares that you’ve stored in your “Wild Goose Chase” baggie. Ready?
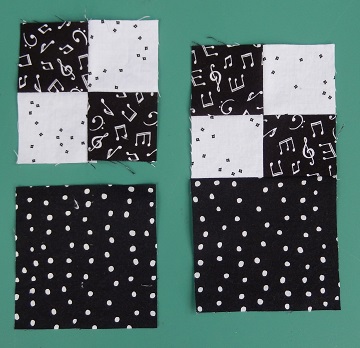
Place a little 4-patch unit right sides together with a Fabric D square. Double check the position of the 4-patch to make sure that it is going in the right direction. (Yes, I did this wrong at least once. No fabric was harmed, but my seam ripper and I had a moment or two.) If you place the squares incorrectly twice in a row, it is time for a break, for sure! Better to stop and clear your head before you continue to make the same error again & again. (How do I know this?) You’ll make 56 sections like this:
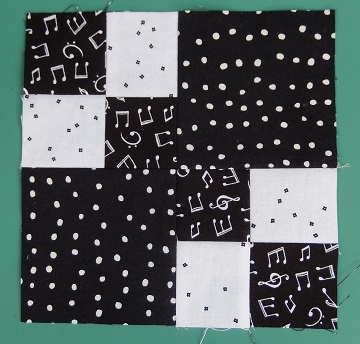
Now sew the sections together to finish up the 28 double 4-patch blocks! See how the little Fabric F squares meet in the middle of the big square? Perfection!

The good news is that you’ve gotten a LOT of practice making 4-patch and double 4-patch blocks, and we won’t need to make many more of them for the rest of this project. I believe that I spent between 4 and 5 hours to complete this part of my quilt. If you don’t have time to stitch ’em all up before we move on to the next step, just make sure that you’ve made at least enough 4-patches for the 28 double 4-patch blocks. We’ll need those for our Wild Goose Chase blocks in a couple of weeks.
So, how do your double 4-patch blocks look? We’d ALL love to see a picture, so snap a photo and post it on Instagram please.
#bwqal_yourname @mspdesignsusa
After you’ve posted your photo, you may enter our giveaway to receive one 15″ individual block pattern (your choice from Ms P’s Pattern Shop, valued at $3.50 USD). Entries will be accepted until February 10 at 12 PM EST. The winner will be notified via email on February 12.
Next week we’re going to tackle those flying goose units when we have a look at “Geese on the Fly!” Until then, may your stitches be straight, your bobbins full, and your seam ripper languishing in the sewing basket.
Happy quilting,
Sharon

2 thoughts on “Those Fabulous 4-Patches”
Comments are closed.