Hi Quilting Friends,
Welcome back to the “Black & White Delight” Quilt-Along. If you’re just joining us, you may want to have a look at the “Welcome” post to help you catch up.
Today we’re going to make the pieced border sections that will be added to the sides of the quilt top. Ready to get started? Let’s gather everything that you’ll need:
- Fabric pieces from your Pieced Borders Baggie, including the little 4-patch blocks from “Those Fabulous 4-Patches”
- Sewing machine
- Thread (I use light gray for piecing)
- Scissors for snipping threads
- Iron & ironing board
- Beverage and snack(s) for maintaining hydration and energy
You’ll be making two different pieced border sections, Border Unit A and Border Unit B. Let’s start by sewing the four Border Unit A sections:

You’ll need eight of the little 4-patch units, four Fabric B rectangles and eight Fabric A squares. All of these pieces should be in your “Pieced Borders” baggie. We’ll use the “stitch, trim, & flip” technique to make the center rectangles in this border section. Here we go!
Start by placing a Fabric A square right sides together on the end of a Fabric B rectangle. Normally we would draw a diagonal line on Fabric B as a stitching guide, but my Fabric B was quite dark and so the pencil line didn’t show well at all. So here’s what I did instead!
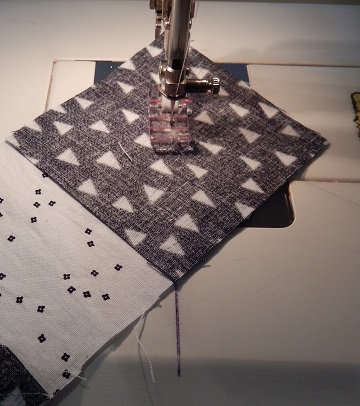
Use a permanent marker to draw a line on the sewing machine bed, right in line with the needle and out toward the front edge. You can then guide the point of the smaller square along the marker line, sewing straight along the diagonal without marking the squares. Pretty slick trick, eh? (This works even if your fabric isn’t dark, and will save you some time drawing pencil lines on little squares.)
After you’ve attached a Fabric A square to each end of your Fabric B rectangles, trim to 1/4″ outside the seam line and then flip and press the triangle toward the outside edge. Just like Darth Vader, you press toward the dark side!


Add a 4-patch square to each end of the rectangle, ensuring that the 4-patch is oriented as shown in the picture above. That’s it for the four Border Unit A sections. Easy peasy.
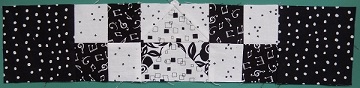
And now the six Border Unit B sections:

You’ll need twelve little 4-patch square units, 4 Fabric C squares, 8 small squares each of Fabric B and Fabric D, and 8 squares of Fabric D. All of these pieces should be in your “Pieced Borders” baggie.
Let’s start by making a few more flying goose units. Look back at the ” Geese on the Fly” post for a refresher if needed. Make six goose units each with Fabric B & Fabric C and with Fabric D & Fabric C, and trim them to the size indicated in your pattern packet on Page 5 Step 5. (Mine aren’t trimmed yet, my bad! I discussed why that was a bad idea last week, so I won’t go there today.) You’ll make six pairs of flying geese, like this:

Attach a little 4-patch unit to each side of the flying goose pairs, paying close attention to the orientation of the pieces, and then add a Fabric D square to each end of the piece. You now have six Border Unit B pieces.
All done! Set the border pieces aside until we are ready to put the quilt top together. Are you getting excited yet? At this stage, I could hardly wait to start piecing my other blocks!
Next week we’ll begin making the rest of the pieced blocks, one block per week! Until then, may your stitches be straight, your bobbins full, and your seam ripper languishing in the sewing basket.
Happy quilting,
Sharon

One thought on “Piece Out, Man!”
Comments are closed.