Hi Quilting Friends,
Welcome back to the “Black & White Delight” Quilt-Along. If you’re just joining us, you may want to have a look at the “Welcome” post to help you catch up.
This week’s block is called “Christmas Star”. It brings a sparkle to our quilt project, and it would also be wonderful on it’s own in a red, green, and white quilt for Christmas snuggling. We’ll use many of the quick piecing techniques that you’ve used for the previous quilt blocks. Here we go!
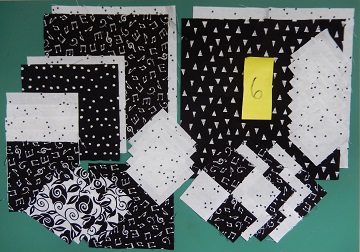
Here’s what you’ll need for this week’s block:
- Fabric pieces from your Block 6 baggie
- Sewing machine (obviously!)
- Iron & ironing board
- Thread
- Scissors for snipping thread
- Pencil
- Rotary cutter & mat
- Ruler(s) I like my little 1″ by 6″ ruler for marking squares
- And my 3.5″ by 12.5″ ruler for cutting
- Beverage & snack(s) for hydration and energy!
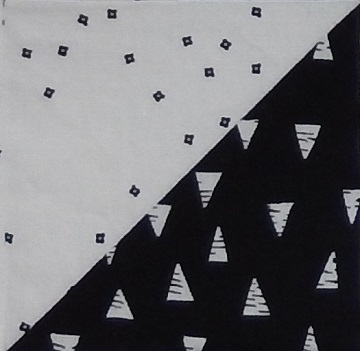
Let’s begin by making eight HST squares with the largest of the Fabric B and Fabric F squares, according to the instructions on page 21, step 2 of the pattern packet. If you need a refresher on making HST squares, look here.
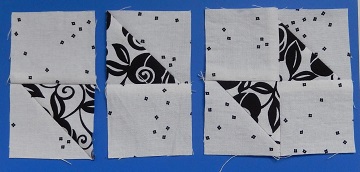
Now draw a diagonal line on the wrong side of the four smaller Fabric E squares, according to the instructions on page 21, step 3. Place the Fabric E square together with a HST square, wrong sides together with the diagonal line perpendicular to the seam. Sew a scant 1/4 inch on each side of the diagonal and then cut along the line. Trim to size, according to the instructions on page 21, step 4. You’ll need to make eight little squares like this:

Now sew the little squares together to make four pieces like this:

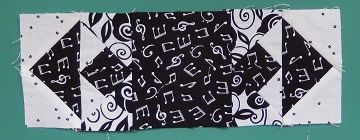
Make a set of four flying goose units with the Fabric F square and four Fabric B squares, according to the instructions on page 22, step 6 of the pattern packet. Here’s the link to review how to make the flying geese. Trim to size, and then sew the flying goose unit to the piece that you just finished, like this, to form the sides of the central Christmas Star block.

Now we’ll make the corners of the block! Begin by making eight HST squares with the Fabric B and Fabric E squares, according to page 22, step 8 of the pattern packet.
Sew the HST squares to the Fabric B squares, like this:

And then sew them together like this to make the four corners of your Christmas Star:
Make two rows like this:

And one row like this:
And then sew the rows together to make the center of your Christmas Star block:

Let’s frame our center block, just like we did for the Friendship Star block.
Use the large squares of Fabric A and Fabric B to make eight HST squares.
Sew the HST squares together with the Fabric A squares and the 4-patch squares to make 2 each of the sections like these:


Add the sides to the Christmas Star center block:

And then sew on the top and bottom rows to complete the Christmas Star block. If you’d like to purchase the Christmas Star block pattern, click the button below.

Time to show off your beautiful Christmas Star block! We’d ALL love to see a picture, so snap a photo and post it on Instagram please.
#bwqal_yourname @mspdesignsusa
Next week we’ll sew the Granny’s Star block! Until then, may your stitches be straight, your bobbins full, and your seam ripper languishing in the sewing basket.
Happy quilting,
Sharon

Oh, that is so pretty! Your blacks and whites were such good choices for this QAL.
LikeLike
Thanks Susan! I’ve always loved black & white, so I choose it often. :o)
LikeLike