
Hi Quilting Friends,
Welcome back to the “Black & White Delight” Quilt-Along. If you’re just joining us, you may want to have a look at the “Welcome” post to help you catch up.
Today we’re going to make an entire skein of flying geese. Why a skein? That’s what you call a group of geese who are in flight; they may also be called a team or a wedge but I think that “skein” is more fun and realistic. If you’ve ever witnessed geese as they migrate, the word “skein” makes a lot of sense. If the geese are gathered on the ground, they’re called a gaggle. And if they’re paddling in the water or flying really close together (so cozy!), then you have a plump of geese. Now you know! (Thank you, Google.)
So here’s a list of what you’ll need for this week’s sewing:
- Fabric pieces from your Wild Goose Chase baggie
- 28 larger Fabric C squares for the goose “bodies”
- 56 smaller squares each of Fabric B and Fabric E for the goose “wings”
- Sewing machine (obviously!)
- Iron & ironing board
- Thread
- Scissors for snipping thread
- Pencil
- Rotary cutter & mat
- Ruler(s) – Here are my go-to rulers, but you should use your favorites!
- 1″ by 6″ ruler for marking squares
- 3.5″ by 12.5″ ruler for cutting & trimming
- Beverage(s) & snack(s) for hydration and energy!
This week you’ll be making flying goose units in two fabric combinations, a total of 56 flying goose units for each fabric pair. The instructions that follow are for the Fabric B & Fabric C flying goose units. Repeat the same steps for the Fabric E & Fabric C flying goose units. Refer to Page 3 Step 4 for the sizes of the fabric squares that we’ll use this week.
Begin by drawing a diagonal line on the back side of each small Fabric B square, using your pencil. I usually do this while I watch TV with my husband, since it doesn’t take a lot of concentration to draw lines on fabric. And it makes him happy to have me in the same room with him. (Ain’t that sweet, after 37 years of wedded bliss!)
Next, place two Fabric B squares right sides together on a Fabric C square. Sew a scant 1/4″ from each side of the diagonal line, as shown in the next picture. By “scant”, I mean that you’re sewing just a thread or two closer to the line. Sewing a tiny bit closer will ensure that your flying goose units will be a tiny bit larger than the required size. You will trim the finished units, so it is fine to have them a tiny bit too big.
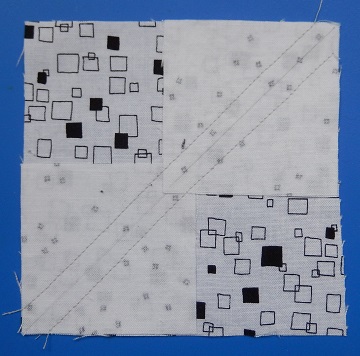
Place your ruler along the pencil lines and cut the square diagonally. Press the B squares out to make them look like ears, as shown in this picture. These pieces remind me of a cat’s face, LOL. Leave the points untrimmed for now. You’ll cut them off when you trim the flying geese to size.

Place another Fabric B square on each of the Fabric C triangles, like this, and then sew a scant 1/4″ from each side of the diagonal pencil line.

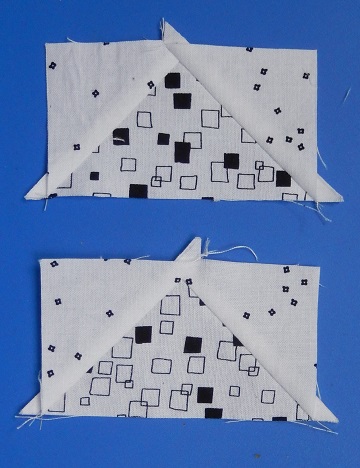
Now place your ruler right along the pencil line and cut. Repeat for the second unit. Press the Fabric B triangles flat to finish up your flying goose units. You’ll have four identical flying geese from each set of four Fabric B squares and one Fabric C square! Carefully trim your flying geese to the size indicated on Page 4 Step 4 of the pattern packet. My pieces are shown before I trimmed them.
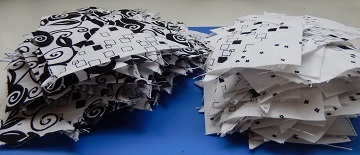
Repeat the steps above with the Fabric E and Fabric C squares to make 56 more flying goose units. You’ll end up with a fairly large stack of flying goose units in each color combination. (See, they have all been trimmed now!)

Now we’re going to sew pairs of flying goose units together, eventually making sections with four flying geese each. My pieces were’t trimmed for the photo, but yours should be. (My bad. I had to go back and unsew some stitches, and then trim and sew again.) You’ll want to trim first, to avoid unstitching anything! Sew the flying goose units into pairs, like the picture. And then sew the pairs together, end to end with all geese “flying” in the same direction, into strips of four geese each. The small triangle fabrics on your 28 finished strips will alternate, as you see in the photo on the right.


It took me about 6 hours to make my wild goose pieces and stitch them together into sets of four geese each. You’ll need all of these four-goose sets to make the Wild Goose Chase blocks.
All righty then! That’s it for now. Picture time! Post a photo of your finished strip of flying goose units on Instagram. #bwqal_yourname @mspdesignsusa
After you’ve posted your photo, you may enter our giveaway to receive one 15″ individual block pattern (your choice from Ms P’s Pattern Shop, valued at $3.50 USD). Entries will be accepted until February 17 at 12 PM EST. The winner will be notified via email on February 19.
Next time we’re going to put together your Wild Goose Chase blocks, using the units that we’ve made so far. So please visit next week, when we’ll be “Chasing the Wild Goose!” Until then, may your stitches be straight, your bobbins full, and your seam ripper languishing in the sewing basket.
Happy quilting,
Sharon

3 thoughts on “Geese on the Fly”
Comments are closed.