
Hi Quilting Friends,
I decided to do something new (for us) this year on Thanksgiving Day. After dinner, while the other adults watched football and visited, I gathered the “littles” together for some easy and fun crafting! They all seemed to enjoy creating, as I had anticipated. Even our super-cool 10-year-old boy who “doesn’t do crafts” got into it and made about five ornaments. We all had fun, making memories together.
I searched for these projects on Pinterest, and then I created these instructions since I wasn’t able to find the source of either idea. So here we go!
Let’s start with the snowman!


- Wine corks
- Metallic pom-poms, 1/2″ diameter
- Plaid fabric
- Craft wire
- Hot glue gun and glue sticks
- Wire cutters
- Small nail
- Permanent marker (We used a Sharpie.)
- Draw a face for the snowman with the marker.
- Cut a piece of craft wire, about 3″ long.
- Poke the nail through the cork, placing it about where the ears would be on the head. (The 8-year old remarked that, if you painted his face green, then he’d look like the Frankenstein monster. LOL!) Remove the nail, unless you change your mind and want Frankie instead.
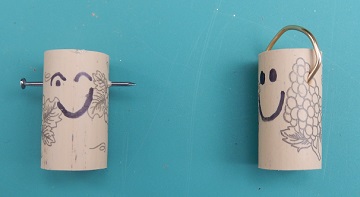
- Insert the ends of the craft wire into the holes left by the nail.
- Glue a pom-pom to cover the spot where the wire goes into the cork.
- Cut a piece of fabric, about 1″ wide and 3 1/2″ long. Fold into thirds along the length to hide the raw edges, and finger-press to help it stay folded.
- Apply a line of glue around the bottom edge of the cork, and glue the scarf in place.
- Ta-da! Your snowman ornament is finished. You can hang him up by attaching a ribbon or thread to the top of the earmuff wire. He’d be cute to hang on the tree or tie to a gift for your favorite teacher.
And now our little angel!


- Wine cork
- 20 mm wood bead
- Metallic chenille stems
- 1 1/2″ wired craft ribbon
- 1/4″ metallic ribbon
- Permanent marker (We used a Sharpie.)
- Hot glue gun and glue sticks
- Scissors
- Wire cutter
- Use the marker to draw the eyes. The hole in the bead makes the angel’s mouth, so place the eyes near it.
- Glue the bead to the top of the cork.
- Cut a section of chenille stem, about 4″ long.
- Wrap the stem loosely around your thumb to make a circle, and then twist the ends together to form the halo.
- Poke the twisted stem into the hole on the back of the angel’s head, and glue in place.
- Cut a piece of wide ribbon, about 12″ long. Fold in thirds to make the wings. Twist in the center to crimp. (The ribbon that we used was covered in glitter, and it is so pretty! And now everything else in the area is also covered in glitter. Looks like maybe a fairy dropped her fairy-dust bag, right in the middle of the kitchen table. After nearly two weeks, we still have glitter!)

- Glue the “wings” to the angel’s back.
- Cut a piece of narrow ribbon, about 4″ long. Fold in thirds to make the bow.
- Glue the bow to the front of the angel’s body.
- Your sweet little angel is finished! You can add a ribbon or thread to the twisted section of her halo if you want to hang her on the tree or tie her to a gift package. Or make a whole choir of angels, singing in exhultation, to celebrate the season!
I hope that you’ve enjoyed seeing our projects today! We sure had fun making them to share with you. Thanks for stopping by- we love to have you visit us. Susan will be here next week, showing off another quick and easy project to make for the holidays.
Happy quilting,
Sharon
